API Tutorial
This document will walk you through most core features or Restcat.
API at a glance
The folling digram outlines all of APIs endpoints. Note that the URL begins with /api/ followed by the version and then is divided into three parts; “accounts”, “socialgraph”, and “transaction”.
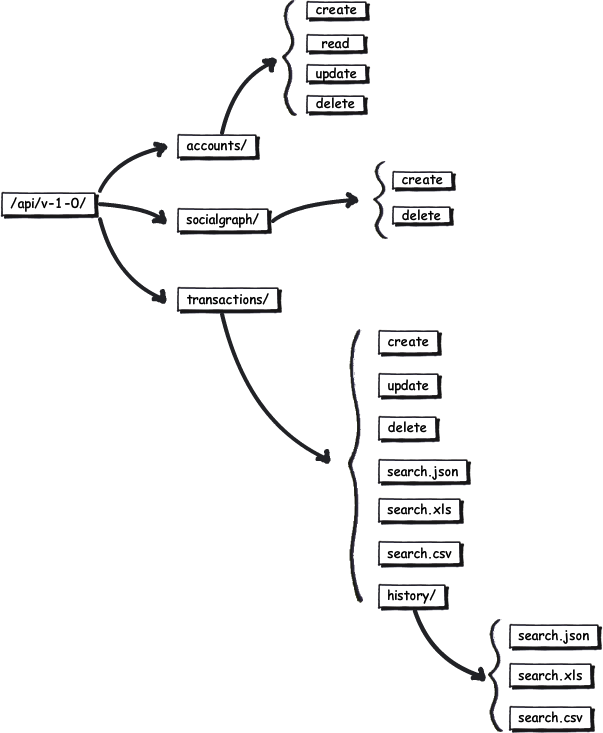
Note that transcation “delete” and transaction “update” may or may not be available depending on the servers configuration.
This is by design, as in some cases it is helpful to not support deletes or updates. Wheather you will uses these functions really depends on your use case.
When implementing this API you need to generate your own dates/times as well as a globally unique transaction ID ( i.e. a UUID ). Your application and the server must agree on the date-time (with default settings), before you can send a transaction. You’ll also need to need to authenticate using a username and password for almost all variations of create and read API functions. These measures provide checks and balances to ensure a high degree of data integrity.
The RESTful nature of the API, means that it can be integrated easily into virtually any programming language or system. Let’s begin by learning how to setup your server and create transactions. In this tutorial we are assuming RESTCat is setup on localhost (127.0.0.1) on port 80. In a production environment you should always serve RESTCat using SSL/HTTPS.
We will gently introduce the API with a simple call that returns the message “Logged In” if you connect to the server successfully and “Forbidden” if you do not supply valid credentials.
| URL: | [PROTOCOL]://[HOST]/api/v1-0/testlogin/ |
|---|---|
| HTTP_METHOD: | GET |
| Example URL: | http://127.0.0.1/api/v1-0/testlogin/ |
| REQUIRES: | None |
The following is an example in curl. Curl is a free command-line HTTP client available for Linux, Mac, Windows, and many other operating systems:
curl -u testuser:testpassword https://127.0.0.1/api/v1-0/testlogin/
If you are able to connect and authenticate to the server, your should see the message “You were logged in” in the response.
"{code:"200", message:"You were logged in"}"
A Quick Example
The following describes how a client might fetch a person’s medical history using the API:
[PROTOCOL]://[HOST]/api/v1-0/transaction/read/user/subject/[USER_ID]/
All that needs to happen is to go to this url (and be authenticated to access the resource).
For Example, we could do this in any programming language or use a tool like curl.
curl -u testuser:testpass http://localhost/api/v1-0/transaction/read/user/subject/ada@foo.com/
The above query returns all transactions about Ada (i.e. where ada@foo.com is the subject). We are authenticating with the username “testuser” and password “testpass”.
Understanding Users
These are the fields for users. In order to create a user via the API, you must have the can_create_users permission.
| Fields | Required | Details |
|---|---|---|
| username | Y | Text. Must be unique |
| first_name | Y | Text. |
| last_name | Y | Text. |
| Y | Text. Valid email. Must be unique. | |
| password | Y | Text. |
| pin | Y | Numeric text. Length must = 4. |
| gender | Y | Text (See gender choices). |
| height_in | Y | Numeric text. Integer. |
| weight_goal | Y | Numeric text. Float or integer. |
| birthdate | Y | Text in format YYYY-MM-DD |
| vid | N | Text. 15 digits. Numeric only. Auto-generated if not supplied |
| complaint_title | N | Text. |
| complaint_detail | N | Text. |
| phone_number | N | Numeric text. Length must be 10 or 11. US numbers Only. |
| mobile_phone_number | N | Numeric text. Length must be 10 or 11. US numbers Only. |
| fax_number | N | Numeric text. Length must be 10 or 11. US numbers Only. |
| organization | N | Text. |
| N | Text. | |
| allergies | N | Text. |
| medications | N | Text. |
| conditions | N | Text. |
| procedures | N | Text. |
| primary_insurance_or_payer | N | Text. |
| secondary_insurance_or_payer | N | Text. |
| health_score | N | Text. |
| steps_per_day_goal | N | Numeric text. Default = 10000. |
| file | N | File (Binary) |
The following are valid values for gender.
| Valid Gender Types | |
|---|---|
| female | |
| male | |
| transgender_male_to_female | |
| transgender_female_to_male | |
| sexual_reassignment_male_to_female | |
| sexual_reassignment_female_to_male |
Creating Transactions
Creating transactions is at the heart of data input to RESTCat. The transaction create method is the workhorse responsible for getting transactions into the system. Your transaction can not be altered or repeated. You must create your own unique identifier, and the server will not allow your client to repeat itself. This is a well thought-out restraint to protect the integrity of the data. Here is how to create transactions:
URL: [PROTOCOL]://[HOST]/transaction/create/
HTTP_METHOD: POST
Example URL: https://127.0.0.1:8000/transaction/create/
REQUIRES: See Following table.
| FIELD | NAME | DETAILS |
|---|---|---|
| id | TransactionID | Must be universally unique identified (e.g. a uuid) |
| tx_dt | TransactionDateTime | Format=YYMMDD:HHMMSSz This is your local system’s UTC time as a sanity check |
| tx_tz | TransactionTimeZoneOffset | A number between -12 and +12 This is the timezone in which the transaction occurred |
| ev_dt | EvenentDateTime | Format=YYMMDD:HHMMSSz The date and time when the event (i.e. reading) occurred. |
| ev_tz | EventTimeZoneOffset | The event’s time zone offset from UTC/Zulu A number between -12 and +12. |
| sndr | SenderID | FROM: Who is sending the transaction? |
| rcvr | ReceiverID | TO: Who or what is recipient of the transaction? |
| subj | SubjectID | WHO:Who is the transaction about?(e.g. memberid, etc) MOST SIGNIFICANT |
SUCCESS RETURN: HTTP/200 OK & newly the newly created transaction in the body.
FAIL RETURN: HTTP/3xx/4xx/5xx/ & Information about the error returned in the body.
If the transaction creation is successful, it will return with HTTP/200 OK and just echo the transaction back to you. If the transaction, creation fails, it will return something besides 200, based on the specific error. Note that your mydt must be within a few minutes of the servers time. Your code cannot create new transactions if it and the other server do not agree on time! You can read the body for more information about the error. The response codes map to standard HTTP response codes. Let’s look at some examples.
Create Examples
The following are examples to create a transaction.
Create a Transaction
Here is an example of a URL to create a transaction.
https://127.0.0.1:8000/transaction/create/
We also need to send in other data not contained in the URL. This POST DATA. will be sent by passing in a dictionary-like form object to the URL. To accomplish this, we send the request as type POST. Consider the following dictionary:
| NAME | VALUE | Details |
|---|---|---|
| id | a1f4f4f8-d5e9-4a55-a57e-a22eefb7a3a5 | The unique ID that you generate |
| tx_dt | 20200310:091900u | Your system’s reported UTC time. |
| ev_dt | 121212:981298u | The date-time of the transaction. Must occur at or before mydt |
| ev_tz | +5:45 | The event’s time-zone offset. Kicking it in Kathmadu, Nepal |
| tx_tz | +5:45 | The transaction’s time-zone offset. |
| sndr | alan@foo.com | User sending the transaction (Your account) |
| subj | alan@foo.com | Subject of the transaction (also a user) |
| rcvr | doctorwho@transparenthealth.org | Receiver for the transaction (also a user) |
To create a transaction with your data, simply pass a dictionary as ‘form data’. You can do this from almost any http client library, but for simplicity we will demonstrate using curl, a popular command line HTTP client. Note that you should generate your own txid (a uuid), date-time stamp, and time-zone offset. You can never reuse a txid, except as a reference ‘txidr’ in a new transaction.
Using curl, we can pass these values as a form POST dictionary like so:
curl -u testuser:test -H 'application/x-www-form-urlencoded' -X POST -d "id=a1f4f4f8-d5e9-4a55-a57e a22eefb7a3a5&ev_dt=121212:054302u&ev_tz=5:45&tx_dt=121214:054301u&tx_tz=5:45&sndr=alan@foo.com&subj=alan@foo.com&rcvr=doctorwho@transparenthealth.org" https://127.0.0.1:8000/transaction/create/ -o out.html
And the server’s response will look like this:
[
    {
    "tx_dt": "20100920:175047z",
    "ev_tz": "-5",
    "ev_dt": "20100919:121212z",
    "bp_pul": "61",
    "texti": "bp110/75p61",
    "rcvr": "a@v.com",
    "value": "110/75p61",
    "sec": "3",
    "sndr": "a@v.com",
    "ttype": "omhe",
    "bp_syst": "110",
    "tx_tz": "-5",
    "omhe": "bp",
    "_id": "c5ea845e-a99e-4e89-974a-8203fc9f6ffe",
    "subj": "a@v.com",
    "tags": [],
    "bp_dia": "75"
    }
]
Create A Minimal Transaction
If we want to create a bare bones transaction, then we need to pass, at minimum, the required fields. You should generate your own uuid for txid and your own UTC date-time stamp as well as your time-zone offset.
| NAME | VALUE | Details *=Required |
|---|---|---|
| id | a1f4f4f8-d5e9-4a55-a57e-a22eefb7a3a5 |
|
| tx_dt | 20200310:091900u |
|
| ev_dt | 121212:981298u |
|
| ev_tz | +5:45 |
|
| tx_tz | +5:45 |
|
| sndr | alan@foo.com |
|
| subj | alan@foo.com |
|
| rcvr | doctorwho@transparenthealth.or |
|
In this transaction we are sending a message from 'alan@foo.com‘, about 'alan@foo.com‘, to 'doctorwho@transparenthealth.org‘.
So we can pass these values to Curl as a form POST dictionary like so:
curl -u testuser:test -H 'application/x-www-form-urlencoded' -X POST -d "txid=a1f4f4f8-d5e9-4a55-a57e-a22eefb7a3a5&ev_dt=121212:054302u&ev_tz=5:45&tx_dt=121214:054301u&tx_tz=5:45&sndr=alan@foo.com&subj=alan@foo.com&rcvr=doctorwho@transparenthealth.org" https://127.0.0.1:8000/transaction/create/ -o out.html
Creating Meaningful & Useful Transactions
The previous example, while undoubtedly amazing, isn’t terribly useful. To make things more interesting, let’s use a little more of our Transaction Model. You might want to skip ahead and take a quick look at all the reserved fields in the transaction model.
Before showing examples, let’s highlight some of the more important optional fields with the following table.
| FIELD | NAME | DETAILS |
|---|---|---|
| texti | TextItem | The transaction’s “ASCII payload”. |
| urli | URLItem | Points to the transaction’s URL resource. This is your “URL payload”. |
| txidr | TranscationIDReference | Links the transaction to other transactions.* |
| urld | URLDescription | Points to a URL that describes ‘urli’. |
| ttype | TransactionType | Denotes the transaction type. It provides key meta-data to help process the transaction. |
Although these are optional, you’ll likely use one or more of these fields in every transaction you create since they will probably map to required fields in your specific application.
** If you populate your transaction with ‘txidr’, then you are linking this transaction to the the original. This is how we create conversations and link transactions together. *
Typically, at minimum, transactions will contain either a ‘urli’ field or a ‘texti’ field. For a list of all fields, see the Transaction Model section below.
The following examples illustrate examples of meaningful applications using RESTCat.
Create a Self Reported Blood Pressure Reading
We’ll need to send the following dictionary containing a bit more information. In this example, user ‘alan’ sends data about user ‘alan’ to user ‘mydoc’. We indicate this message is in OMHE format and the value is ‘bp=120/80p60’.
| NAME | VALUE |
|---|---|
| id | b1f4f4f8-d5e9-4a55-a57e-a22eefb7a3a5 |
| tx_dt | 20200310:091900u |
| ev_dt | 121212:981298u |
| ev_tz | -8:00 |
| dt_tz | -8:00 |
| sndr | alan@foo.bar |
| subj | alan@foo.bar |
| rcvr | harvey@foo.bar |
| omhe | bp |
| texti | bp=120/80p60 |
| ttype | omhe |
In curl:
curl -u testuser:test -H 'application/x-www-form-urlencoded' -X POST -d "txid=b1f4f4f8-d5e9-4a55-a57e-a22eefb7a3a5&dt=121212:981298u&tzo=-5&sndr=alan@foo.bar&subj=alan@foo.bar&rcvr=harvey@foo.bar&omhe=bp&texti=bp120/80p60&stype=omhe" https://127.0.0.1:8000/transaction/create/ -o out.html
For every transaction, simply create your dictionary and attach it to the POST. That’s all there is to it!
Create a Direct Medical Device Reading
In this example, device (sender) ‘alan_bp_device’ sends data about user ‘alan’ to user ‘mydoc’. We indicate this message is in OMHE format and the value is ‘bp=120/80p60’. We also we supplied an optional device identifier ‘did’.
| NAME | VALUE |
|---|---|
| txid | c1f4f4f8-d5e9-4a55-a57e-a22eefb7a3a5 |
| mydt | 20200310:091900u |
| dt | 121212:981298u |
| tzo | +5:45 |
| sndr | alan_bp_device@foo.bar |
| subj | alan@foo.bar |
| rcvr | mydoctor@foo.bar |
| omhe | bp |
| texti | bp=120/80p60 |
| ttype | omhe |
| did | 22eefb7a3a5 (device identifier) |
Create a PDF Document Message Transaction
Here we just want to create a PDF resource pointer. If you need to a binary file, use the FilesAPI.
| NAME | VALUE |
|---|---|
| txid | e1f4f4f8-d5e9-4a55-a57e-a22eefb7a3a5 |
| mydt | 20200310:091900u |
| dt | 121212:981298u |
| tzo | -8:00 |
| sndr | alan@foo.bar |
| subj | alan@foo.bar |
| rcvr | alan@foo.bar |
| name | mydoc.pdf |
| urli | http://foo.com/mydoc.pdf |
| ttype |
Create an HL7 Message Between 2 Providers
Here the transaction is between provider ‘a’ and ‘b’. The transaction is about ‘alan’. This is HL7 data. We also added a name to the transaction.
| NAME | VALUE |
|---|---|
| txid | f1f4f4f8-d5e9-4a55-a57e-a22eefb7a3a5 |
| mydt | 20200310:091900u |
| dt | 121212:981298u |
| tzo | -5:00 |
| sndr | doctora@foo.bar |
| subj | alan@foo.bar |
| rcvr | doctorb@foo.bar |
| name | file.hl |
| urli | http://foo.com/mydoc.hl |
| ttype | hl7 |
Create a ‘Checklist’ Transaction
Note in this example that the urli (URLItem) points to a JSON file. This is the ‘definition’ for the checklist. You can get creative here, but our example simply points to a dictionary listing the ‘tasks’ that make up the checklist. We use a JSON file, but you could use XML or something else.
| NAME | VALUE | NOTES |
|---|---|---|
| txid | 11f4f4f8-d5e9-4a55-a57e-a22eefb7a3a5 | |
| mydt | 20200310:091900u | |
| dt | 121212:981298u | |
| tzo | -5:00 | |
| sndr | doctor1@foo.bar | |
| subj | alan@foo.bar | |
| rcvr | alan@foo.bar | |
| name | mydoc.pdf | |
| omhe | cl | This is a checklist |
| urli | http://videntityshare.s3.amazonaws.com/emergency_checklist.json | Points to the checklist definition |
| ttype | omhe |
Create a ‘Task’ Transaction (Complete a task on the Checklist)
Here we are referencing a previous transaction with ‘txidr’, hence creating a ‘conversation’. In this example we are following up on a task from the checklist created in the previous step.
| NAME | VALUE | NOTE |
|---|---|---|
| txid | 21f4f4f8-d5e9-4a55-a57e-a22eefb7a3a5 | Transaction ID |
| tx_dt | 20200310:091900u | Transaction DateTime |
| ev_dt | 121212:981298u | Event DateTime |
| tx_dt | -5:00 | Transaction TimeZoneOffset |
| ev_dt | -5:00 | Event TimeZoneOffset |
| sndr | alan@foo.com | Transaction Sender |
| subj | alan@foo.com | Transaction Subject |
| rcvr | doctorwho@transparenthealth.org | Transaction Receiver |
| txidr | 11f4f4f8-d5e9-4a55-a57e-a22eefb7a3a5 | Transaction reference is how we reference an older transaction and build conversations. |
| name | Task1Completed | A label for the transaction |
| omhe | tsk | Tells us this is an OMHE task. (A ‘task’ is just an item on a checklist) |
| urli | http://foo.com/urlifromTask.txt | The URL item pointer (a.k.a. the “url payload”). In this case it points to details of the task. |
| texti | “OK. Notes from the Task.” | The text item (a.k.a the “text payload”) |
| ttype | omhe | Transaction Type = OMHE |
So now if we read the transaction history for the Checklist, we get back the Checklist and a list of completed tasks. So you get the big picture and situational awareness. See how to query in the next section.
Reading and Querying Transactions
All transaction read operations use HTTP GET and begin with
- URL:
- https://127.0.0.1:8000/transaction/read/<id>/
The ‘id’ is the UUID for the transaction. JSON is returned.
Query Examples
Get a Single Transaction
Get a single transaction as a json object (default).
https://127.0.0.1:8000/transaction/a1f4f4f8-d5e9-4a55-a57e-a22eefb7a3a5/
Get a Transaction and its Children (History)
Get a transaction and all its related transactions (Conversation History).
https://127.0.0.1:8000/transaction/read/transactions/history/a1f4f4f8-d5e9-4a55-a57e-a22eefb7a3a5/
Same as above, but get back XML instead of JSON.
https://127.0.0.1:8000/transaction/read/transactions/history/a1f4f4f8-d5e9-4a55-a57e-a22eefb7a3a5/xml/
Get All Transactions about a Person, Device
Get the entire person (or actor’s) history.
https://127.0.0.1:8000/transaction/read/user/subject/ada@foo.bar/
Here are some additional real world examples:
Query for a Single Transaction
URL:
[PROTOCOL]//:[HOST]/api/v1-0/read/[txid]/
Example:
https://127.0.0.1/api/v1-0/read/a1f4f4f8-d5e9-4a55-a57e-a22eefb7a3a5/
Curl Example. (You can do this w/ any /api/v1-0/transaction/read/ ):
curl -u testuser:testpasswd -X GET https://127.0.0.1/api/v1-0/read/a1f4f4f8-d5e9-4a55-a57e-a22eefb7a3a5/ -o out.txt
Query for a specific set of OMHE Readings
URL:
[PROTOCOL]://[HOST]/api/v1-0/omhe/find/[omhe]/[subj]/
Example(Grab blood pressure readings for a user:
https://127.0.0.1/api/v1-0/omhe/find/bp/alan@foo.bar/
Curl Example:
curl -u testuser:testpasswd -X GET https://127.0.0.1/api/v1-0/find/omhe/bp/alan@foo.bar/ -o out.json
Responses & Erroneous Responses
If everything is OK, then your data is returned in the body of the response. In our curl examples, this content is written out to “out.json”
If the record did not exist, the web server will respond to something not equal to 200. For example, if we ask for a transaction that does not exist.
https://127.0.0.1/api/v1-0/transaction/read/9f4f4f8-d5e9-4a55-a57e-a22eefb7a3a5/
Server responds:
HTTP/1.1" 410 DOES NOT EXIST
.
.
Gone
If we try and execute a command that doesn’t exist, for example:
You’ll get:
HTTP/1.1 404 NOT FOUND
You should make sure your application pays attention to the HTTP response code first and then decide what to do with the body. If it’s not a 200 response, the body should contain more information about the error.
Social Graph
If the server has a default configuration where RESPECT_SOCIAL_GRAPH=True, the RESTCat will only return data where an appropriate social relationship exists. For example, a social graph may exist between:
RESTCat social graph is a direct graph so “sharing/access” is not bi-directional unless two graphs exist. The key concepts here are “grantor” and “grantee”. If Chris grants access to Alan to see his transaction, then Chris is the “grantor” and Alan is the grantee. The social graph is built into the RESTCat application.
You can create a graph through the administrator interface and other ways. Depending on yur requirements, how a social graph get created is a use case and user flow you will need to decide for yourself. For example, Videntity provides a way to create the social graph via an automated telephone confirmation.
Any user can grant access to another (via the API), but in order to create other social graphs, the user must have special permission. See the API reference documentation for more information.
If a person is self-reporting information, then a social graph must exist between that user and himself. The happens automatically when a user is created via the API. This may seem counter-intuitive at first, but just remember this is just how RESTCat works and ensures security and access control. Organizations and Applications can also be users, hence one might grant access to an entire application or an organization as a whole.